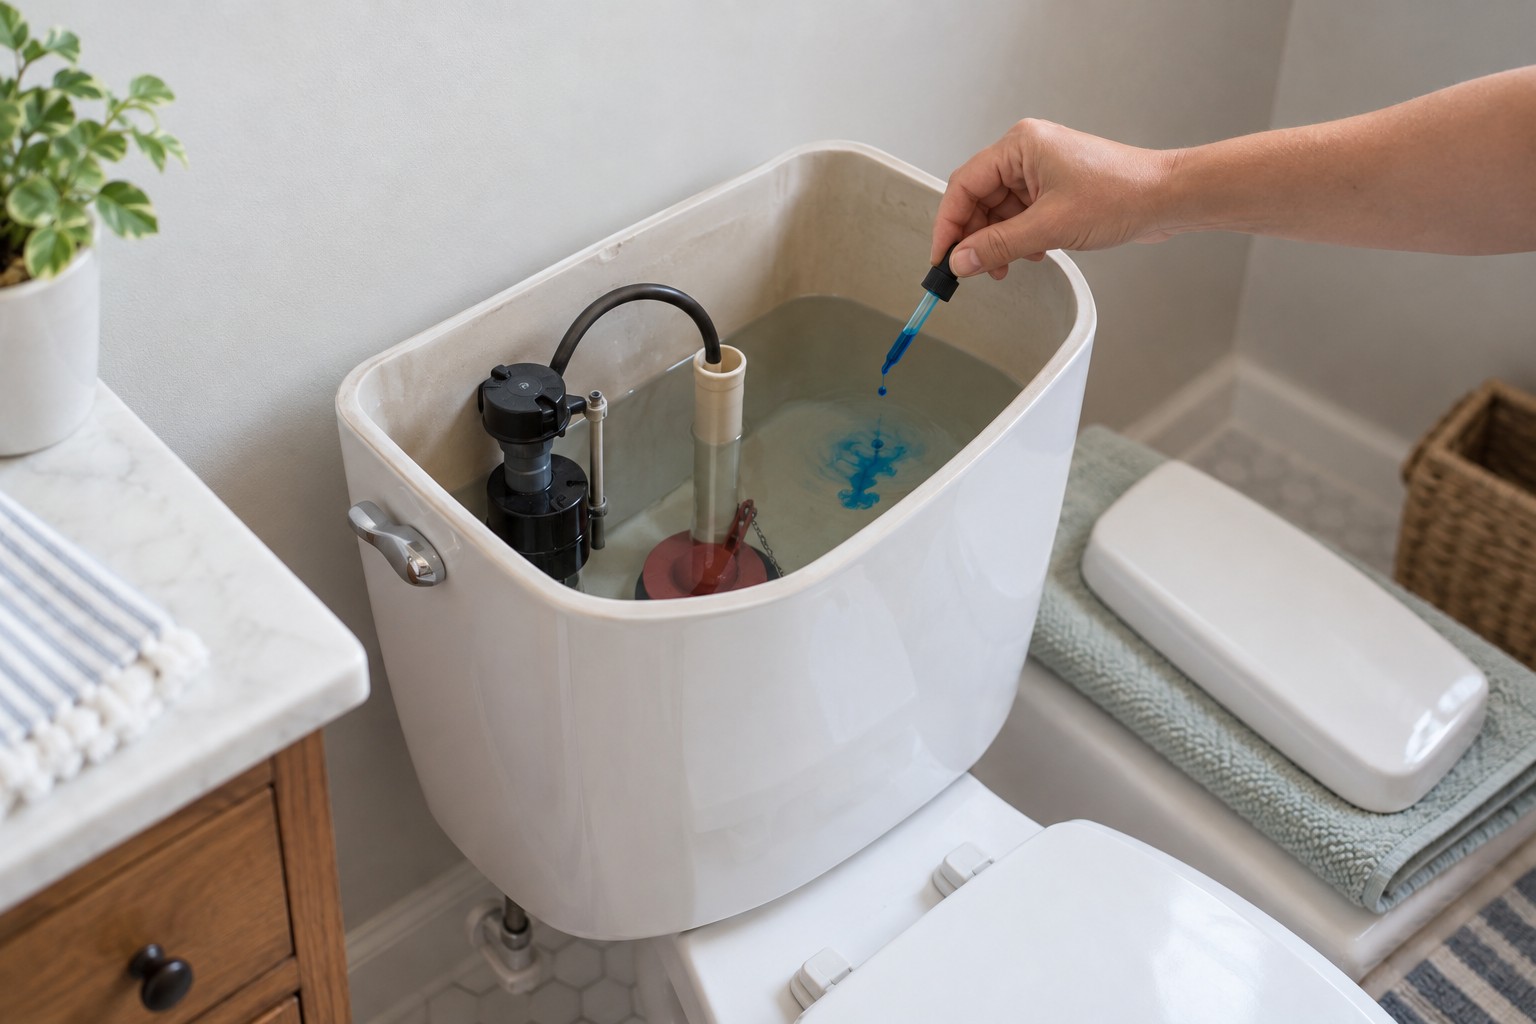
Short answer: Add a few drops of food coloring or a dye tablet to the toilet tank, wait 10 minutes without flushing, and check the bowl. Color in the bowl confirms that water is passing from the tank, often through a worn flapper or flush-valve seal. Flush immediately after the test to reduce staining. The dye test is the best first move because it confirms a seal leak before you buy a part; compatibility matters more than a package that merely says universal.
Stop before replacing a flapper if
- The toilet is wall-hung, pressure-assisted, tankless, or uses a canister or proprietary seal instead of a conventional flapper.
- The shutoff valve is seized, corroded, leaking, or will not stop the water.
- The porcelain is cracked, the toilet rocks, or water appears around the base or supply connection.
- Water continuously flows into the overflow tube after the float should stop it; the fill system may be the problem.
Run the 10-minute toilet dye test
- Wait until the tank has fully refilled and no one will use the toilet.
- Lift the tank lid with both hands and place it flat on a padded, stable surface.
- Add a few drops of food coloring or a toilet dye tablet to the tank water. Do not flush.
- Wait 10 minutes, then look in the bowl without moving the handle.
- If color appears in the bowl, the tank-to-bowl seal is leaking.
- Flush immediately after checking so the dye does not remain on the surfaces.
EPA WaterSense recommends this silent-leak check at least once a year. A negative result means the flapper did not visibly leak during that test; it does not explain water around the toilet, a faulty supply line, or intermittent fill-valve behavior.
Confirm that your toilet uses a flapper
A conventional flapper is a hinged rubber, plastic, or silicone seal over the flush-valve opening. The handle lifts it with a chain. Some toilets use a canister, tower, disc, or model-specific seal instead. Photograph the tank interior and find the toilet’s model number—often stamped or labeled inside the tank—before shopping.
EPA recommends matching the width and design and noting whether the old assembly has a foam float. Bring the old flapper or a clear photo to the store, or use the owner’s manual and manufacturer parts lookup. Do not assume every part labeled universal will match the seat, mounting ears, flush volume, or chain geometry.
Inspect before buying a replacement
- Flapper surface: look for warping, cracks, swelling, stiffness, slime, or a sealing edge that no longer lies flat.
- Chain: check for tangles, corrosion, snagging, excessive slack, or tension that holds the seal open.
- Flush-valve seat: with the water off and tank drained, check for removable debris or mineral buildup without scraping or damaging the surface.
- Overflow tube: if water is flowing over its top, diagnose the fill valve or water-level setting rather than blaming the flapper alone.
How to replace a conventional toilet flapper
- Obtain the exact compatible replacement and read its instructions before shutting anything off.
- Turn the toilet’s accessible supply valve clockwise only if it operates normally. Flush and hold the handle as directed to drain the tank.
- Unhook the chain from the lever arm and detach the old flapper from its mounting points. Note the chain position and any part setting.
- Wipe loose debris from the flush-valve seat with a compatible soft cloth. Do not chip, sand, or force the plastic or porcelain.
- Attach the new flapper exactly as its instructions show and reconnect the chain in a straight path.
- Leave the amount of slack specified for that part. Too tight can hold the seal open; too loose can limit the lift or snag.
- Restore the water slowly, let the tank fill, and test several normal flushes while watching the mechanism.
- Repeat the 10-minute dye test after the tank refills.
Korky’s instructions illustrate this sequence for compatible flapper toilets, but adjustment details vary. The replacement part and toilet manual control the final chain position and any adjustable flush setting.
When replacement does not stop the leak
If dye still reaches the bowl, recheck compatibility, chain routing, and removable debris. Stop if the flush-valve seat is damaged, the overflow assembly moves, tank hardware leaks, or the correct part cannot seal. Those conditions can require tank removal or replacement of the flush-valve assembly, which is a sensible point to use a qualified plumber.
A toilet that keeps refilling can also have a fill-valve or water-level problem. Continuous water entering the overflow tube is not fixed by repeatedly changing flappers.
How often should a flapper be checked?
EPA WaterSense recommends a silent-leak test at least annually and says flappers should be replaced at least once every five years because they wear out. Use that as a maintenance baseline, not a reason to discard a model-specific long-life seal early when its manufacturer gives different instructions. Replace sooner when a dye test fails or the part is visibly damaged.
The practical bottom line
Test before buying, identify the exact toilet and seal design, and verify the repair with the same 10-minute test. Do not force a bad shutoff or turn a simple flapper job into tank removal. Continue with safe leak checks before calling a plumber, review bathroom moisture control, or browse the Bathroom hub.
Sources
These official references were used for the factual guidance and limits above.
- EPA WaterSense Home Maintenance: annual dye test, 10-minute wait, flushing after the test, and flapper replacement interval
- EPA WaterSense Fix a Leak Week: flapper function, compatibility checks, and escalation guidance
- Korky replacement guide: model-specific example sequence and chain adjustment trade-offs